Installing FunnelWeb Blog Engine
As I am starting my blog and writing this post FunnelWeb does not have any installation document/instruction. So I thought I would write down what I did to get this up and running as a post to thank the team behind the engine. Since this is more like a step-by-step installation instruction, I will try to cover it in the smallest and most basic steps so that everyone can follow:
Get the source code
The first thing I did was to download the source code from here (I have got Mercurial and TortoiseHG installed on my machine. You may get it from here if you do not have it already. After you install Mercurial) The only thing you need to do is to run the command from the FunnelWeb source code page from a path on your machine. You should see something like this when you are done:
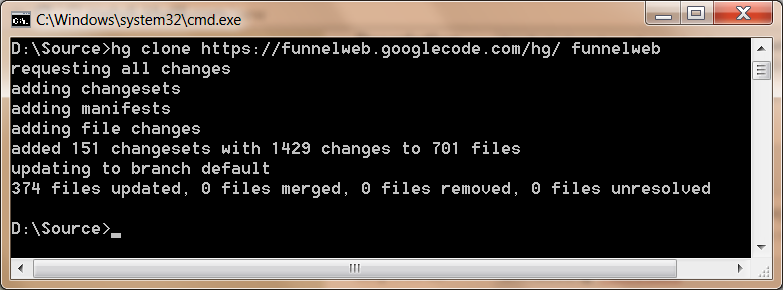
The screenshot is from when the source code was hosted on google code. You should use the url to BitBucket provided above
From this point on, I assume that you have run the command inside ‘D:\Source’ so your code is in ‘D:\Source\funnelweb’ folder.
Build the code
Now that you have the source code you may build it and run the tests very easily by running the Build.bat from the code folder:

After a few seconds the website is built, tests are run and the blog is published into ‘D:\Source\funnelweb\build\Published’ folder:

The screenshot is rather old and now you should see many more folders in your published folder.
Running the blog locally
It makes sense to run the blog on your machine before publishing it and it is easier for me to explain it this way; so let’s do it:
Open the FunnelWeb solution from ‘D:\Source\funnelweb\src’ folder. Open the web.config from the FunnelWeb.Web project. On the top you find some comment that explains the changes you need to make:
- It appears that the website requires a database called FunnelWeb on an instance of SQLEXPRESS on your local machine. Feel free to change the connection string. Basically what you need is an empty database with its connection string inside your web.config.
- The other thing that you may want to change is your administration password that is setup in ‘system.web/authentication/forms/credentials/user’ config section. For now you may leave it as is; but make sure you change it before you publish the real thing.
Running the solution from Visual Studio, here is the page you will see:

Enter your credentials as you specified in the web.config. When logged in, in the middle of the page you will see a section where the connection string you specified inside the web.config is displayed plus the result of a connection test. Make sure that the result is green; i.e. the website has been able to connect to your database:

If it is not green, change the connection string inside the ‘Connection string’ box and click the ‘Save and Test’ button. If it is green, you are ready to install the database. FunnelWeb has a DatabaseDeployer that goes through a series of scripts and runs them on the database you have specified to bring it up to the latest schema. To run the scripts you need to click on the button ‘Upgrade to version x’ (where x is 14 at the time of writing this post) on the bottom of the page . Clicking that will take you to another page where the scripts are run on your database and the result is displayed:

The screenshot is from the version I installed when I wrote this article. At the time the log was missing ul/li tags and looked a bit untidy. The current version displays a nice summary.
That is it. You are done. You can now start writing posts. Well, it is on your local computer though. So you need to publish this to your host.
Publishing the website
All is left to do is to publish the website. Open the ‘D:\Source\funnelweb\build\Published’ folder. First you need to edit the web.config.sample file. Changes are going to be similar to those we made locally; except that the connection string is going to be the connection string of the database in your website host, and the username password are better not left test/test :o)
After changing the settings inside web.config.sample remove the ‘.sample’ from the end and copy everything from the Published folder to your host. Now when you navigate to your website you will be faced with the administration logon page similar to what you saw locally.
In my case, the css was not loaded (and I did not spend any time on it to see why that happened); but after running the scripts everything looked normal.
That is all. You may also want to have a look at the source code as there are quite a lot of nice tricks that you can learn from.
Hope this helps.